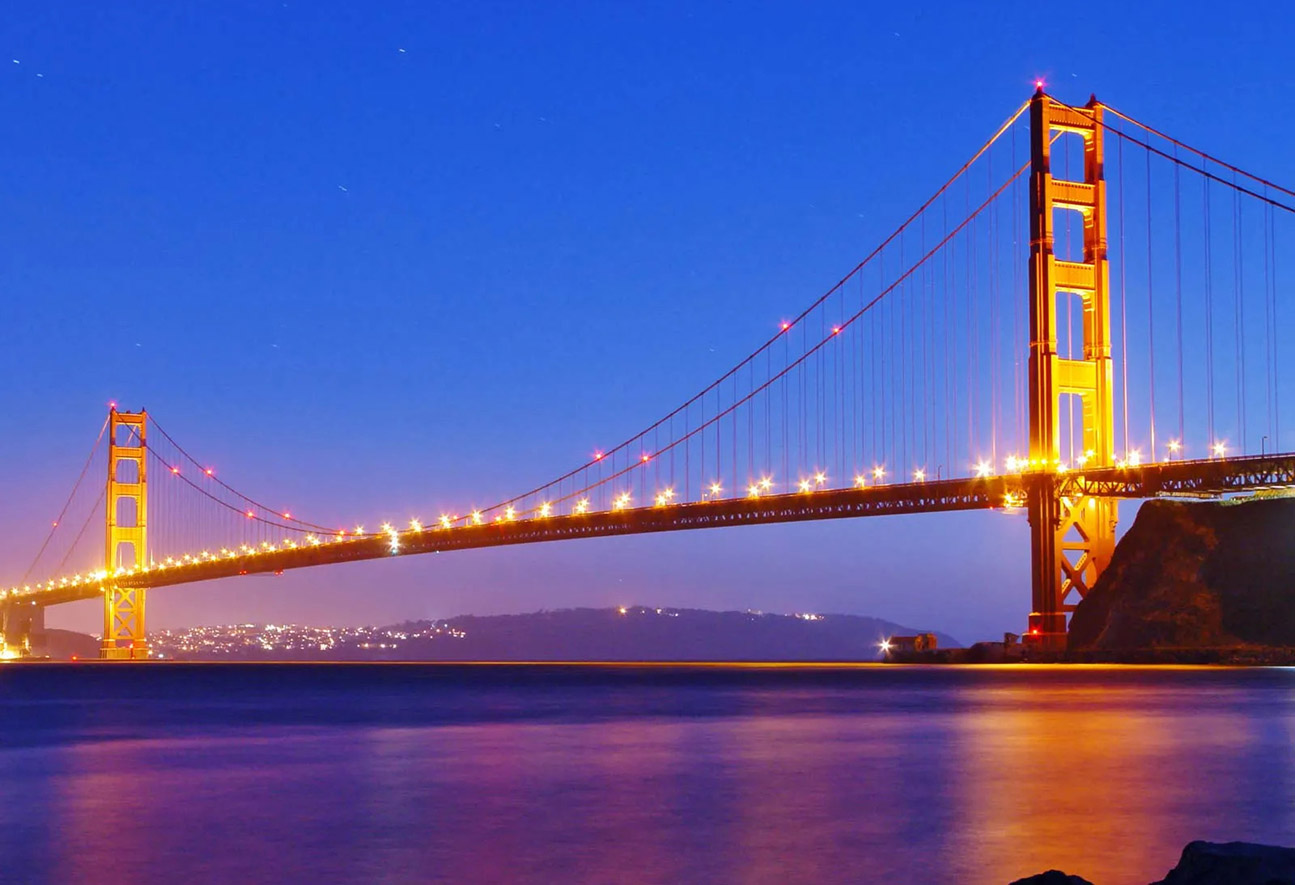
There’s no denying that the Golden Gate Bridge is one of the most iconic structures in the world. Spanning the Golden Gate Strait and connecting San Francisco to the Marin Headlands, this monumental bridge has become a symbol of innovation, resilience, and beauty. Whether you’re visiting San Francisco for the first time or have made this city your second home, capturing the perfect photo of the Golden Gate Bridge is an essential part of the experience. I’ll walk you through the best places to take stunning photographs, share some tips on how to capture the bridge at its most photogenic moments, and provide insights into its rich history. By the end of this post, you’ll know how to make the most of your Golden Gate Bridge visit and leave with memories (and photos) to treasure forever.
The Golden Gate Bridge: A Quick History
Before we dive into photography tips, let’s take a moment to appreciate the Golden Gate Bridge’s fascinating history.
Constructed between 1933 and 1937, the Golden Gate Bridge was designed by architect Joseph Strauss and was, at the time of completion, the world’s longest suspension bridge. Its striking International Orange color was chosen not only for visibility but also because it complements the natural surroundings, particularly the fog that often envelops the bridge. Standing 746 feet (227 meters) above the water, the bridge stretches 1.7 miles (2.7 kilometers) and offers some of the best panoramic views in San Francisco.
While the Golden Gate Bridge is undeniably beautiful, it’s also an engineering marvel, and it has witnessed incredible moments in history. From its opening to being featured in numerous films and photographs, the Golden Gate Bridge continues to capture hearts around the world.
Now, let’s dive into how you can capture this magnificent piece of architecture in the best possible way.
Best Locations to Photograph the Golden Gate Bridge
The Golden Gate Bridge has a variety of viewpoints that offer different perspectives, each providing its own charm. Here are some of my favorite spots to get the best shots:
1. Battery Spencer
- Location: Marin Headlands, Marin County, across the Golden Gate Bridge
- How to get there: The best way to access Battery Spencer is by driving across the Golden Gate Bridge and following the signs to Marin Headlands. There are public transit options, but driving offers more flexibility. Parking is available.
Battery Spencer offers one of the most dramatic and sweeping views of the Golden Gate Bridge, with the bridge rising majestically above the waters of the strait. This location is often less crowded than some of the other viewpoints on the San Francisco side, which allows for more peaceful photography sessions.
Best Time to Visit: Early morning or late afternoon
- Why: This is the golden hour when the light is soft, warm, and ideal for capturing the bridge with the fog rolling in or glowing against the backdrop of the bay. The bridge is often illuminated by the first or last light of the day, creating dramatic contrasts.
Photography Tip: Use a wide-angle lens to capture the vastness of the scene. A tripod is highly recommended for stability, especially during low light conditions.
2. Crissy Field
- Location: San Francisco
- How to get there: Crissy Field is easily accessible via Presidio Parkway, with parking available along the beach. Alternatively, you can walk or bike along the Golden Gate Promenade.
Crissy Field offers a fantastic view of the Golden Gate Bridge with the added bonus of the beach and waterfront. This location allows you to photograph the bridge from a different perspective, with the water in the foreground. It’s an excellent spot to capture the bridge’s full length while giving a sense of the landscape.
Best Time to Visit: Late afternoon or sunset
- Why: The sunlight at sunset casts a beautiful golden hue on the bridge and the water, creating an atmospheric glow. It’s also the perfect time to capture the famous San Francisco fog that often surrounds the bridge at nightfall.
Photography Tip: For more dramatic shots, use a telephoto lens to zoom in on the bridge and create a more focused composition. Try experimenting with long exposure photography for a soft, ethereal effect on the waves.
3. Golden Gate Bridge Welcome Center
- Location: San Francisco
- How to get there: The Welcome Center is located on the San Francisco side of the bridge, near Vista Point. It’s easy to access via public transportation or by driving across the bridge. Parking is available but can fill up quickly.
The Golden Gate Bridge Welcome Center is a great location for those who want to combine photography with learning about the history of the bridge. From the observation area, you can capture a clear shot of the bridge, framed by lush greenery. The Welcome Center also provides plenty of historical information and exhibits that give more context to your visit.

Best Time to Visit: Morning or early afternoon
- Why: This is when the bridge is fully visible, with clear skies. You can capture the bridge with the city skyline in the background or look out toward the open bay.
Photography Tip: A polarizing filter can help reduce glare on the water and enhance the sky’s colors. If you’re in a crowded spot, focus on finding a spot along the edge to get the best angle without too many distractions in the frame.
4. Marin Headlands Coastal Trail
- Location: Marin Headlands, Marin County
- How to get there: From San Francisco, drive across the Golden Gate Bridge, and follow signs to the Marin Headlands. You’ll be able to hike on the Coastal Trail, which provides stunning views of the bridge.
If you’re looking for something more adventurous, consider hiking along the Coastal Trail in Marin Headlands. From various points on the trail, you can get amazing panoramic shots of the Golden Gate Bridge, framed by rugged coastal cliffs and sprawling greenery. This spot is great for capturing both the bridge and the vastness of the bay.
Best Time to Visit: Sunset or early morning
- Why: The changing light and dramatic landscapes make for incredible photos, especially if you’re trying to capture the foggy atmosphere around the bridge at dusk.
Photography Tip: For the best effects, use a wide-angle lens to capture both the landscape and the bridge, and don’t be afraid to experiment with silhouettes as the sun sets behind the structure.
Photography Tips for the Golden Gate Bridge
Taking a great photo of the Golden Gate Bridge isn’t just about picking the right spot—it’s also about how you approach the photography itself. Here are a few tips that I’ve found incredibly helpful when capturing the bridge:
1. Timing Is Everything
The best times to photograph the Golden Gate Bridge are during the early morning or late afternoon, when the sun casts soft light on the structure. However, if you want to catch the iconic San Francisco fog surrounding the bridge, early mornings or evenings are your best bet. The fog often rolls in around dawn and can create dramatic, mysterious photos.
2. Play with Composition
The Golden Gate Bridge offers countless angles, so don’t just settle for the traditional shots. Try framing the bridge between trees or fences, or experiment with leading lines where paths or roads direct the viewer’s eye to the bridge. Additionally, consider reflections on the water when photographing the bridge from spots like Crissy Field.
3. Bring a Tripod
If you’re aiming for sharp, clear shots, especially in low light or when experimenting with long exposures, a tripod is a must. It helps stabilize your camera, ensuring that every shot is crisp and clear. It’s especially useful when photographing at night or during long-exposure shots of the bridge’s lights.

How to Get Around and Explore the Golden Gate Bridge
Public Transport:
The Golden Gate Bridge is easily accessible by public transportation, and the Golden Gate Transit buses serve the area. There’s also the option to use the San Francisco Muni buses that provide stops near the bridge.
If you’re staying in the city, the Muni 28 bus is one of the most convenient options to reach the Golden Gate Bridge from downtown San Francisco.
Driving:
For those who prefer flexibility, driving is the easiest option. There are plenty of parking lots on the San Francisco side (near the Welcome Center) and on the Marin Headlands side (near Battery Spencer). However, parking can be tricky on weekends, so I recommend arriving early, especially during peak tourist season.
The Golden Gate Bridge is undoubtedly one of the most photographed structures in the world, and with good reason. Its majestic design and striking location provide countless opportunities for stunning photos. Whether you’re capturing it with a classic shot from Battery Spencer, or from the unique vantage point of Crissy Field, there’s no shortage of breathtaking views to discover.
Remember to plan your trip around the best light for photography—early mornings and late afternoons are ideal. Bring your camera, a tripod, and a creative mindset to experiment with angles and compositions. Don’t forget to enjoy the history and the cultural significance behind the bridge as you visit these iconic spots.
I hope this guide helps you make the most of your visit to the Golden Gate Bridge, and that you come away with amazing memories (and photos) to cherish for years to come. Happy shooting!